


How To Build a DIY Greenhouse
“How To Build a DIY Greenhouse” was written by a paid contributor. All photos by Simon Says DIY.
A DIY greenhouse can help take your home gardening game to the next level! A bright, humid greenhouse supports seed starting and makes it easier to protect delicate potted plants throughout the year. It can also add visual appeal and value to your property. This charming greenhouse uses reclaimed windows and was constructed with the help of Flex Glue and Flex Seal Liquid.
Read on to learn how to build a greenhouse and how Flex Seal products can help strengthen its construction.

Get supplies for this project now at Lowe's.
Materials
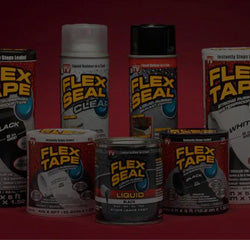
● 2 Flex Seal Liquid gallons, white
● 3 Flex Glue 9oz cartridges, clear
● 2x4x8’ (34 boards)
● 2x4x8’ (4 pressure-treated boards)
● 2x4x12’ (1 board)
● 2x4x12’ (1 pressure-treated board)
● 2x6x8’ (9 boards)
● 2x6x14’ (1 board)
● 1x4x8’ Furring strips (6 boards)
● 1x6x12’ (2 pressure-treated deck boards)
● 2x6 Joist hangers (7)
● 2’x8’ Corrugated polycarbonate clear roofing (12 sheets)
● 6” Carriage bolts (6)
● 2-½” Exterior screws or nails (1 five-pound box)
● Roofing screws (1 box)
● Windows and doors (sizing of your choice)
● Cordless drill
● Nail gun
● Level
● Speed square
● Caulk gun
● Miter saw
● Tape measure
● Paint roller and tray
● Paintbrush
Note: Use caution when working with power tools and always follow manufacturer’s instructions. Before using Flex Seal products, read all directions and take proper safety precautions, such as being in a well-ventilated area and wearing protective gear while applying.
Below, we’ll go through the steps that creator “Simon Says DIY” took to build this DIY greenhouse. For a more detailed look:
Steps
1. Build DIY Greenhouse Foundation

The first step to building a greenhouse is to install a level area for your foundation. This tutorial demonstrates building atop bricks and concrete, but you can also reliably install over a concrete slab, gravel, sand, or dirt.
Flexpert Tip: If you lay a gravel, sand, or dirt foundation, you may also want to layer a weed blocker or have another plan to manage weeds.
2. Take Measurements and Source Windows

The windows you choose will influence how your walls are planned and structured in the upcoming steps, but this tutorial will be flexible to your needs. For this project, reclaimed windows were used to help keep costs low. If you aren’t a fan of upcycling or can’t find what you’re looking for secondhand, you can always purchase new windows in your preferred size.
Flexpert Tip: If the windows and door need painting, it will be easier to paint them before they are installed in your DIY backyard greenhouse.
One thing worth remembering is that any area not filled in with windows will be covered with clear siding, which simulates a window and will still protect the interior from the elements.
This lean-to style greenhouse is designed to attach to a garage or shed, so you will need to plan the framework for three walls. The parallel wall to the structure may fit 2-3 windows and the back wall may be large enough to accommodate 1-2 more windows. The front wall can serve as an entrance to the greenhouse and may be wide enough to fit a door and 1-2 narrow windows.
As you frame openings for windows, remember that the spaces must be completely square. You can test the fit of your window at any time but you won’t actually attach the window to the frame until step 9.
3. Build DIY Greenhouse Walls

Next, you’ll use the 2x4s to build the greenhouse walls. Using a pressure-treated 2x4 as the bottom plate will help protect your DIY backyard greenhouse against premature rot and water damage.
Flexpert Tip: As you build, include wall studs every 16” on center.
Flex Glue can serve an important role during construction. Use the caulking gun to apply Flex Glue to critical joints while framing to help the structure hold while you screw or nail boards together. The super-strong adhesive can also be used on larger surfaces to increase the strength of the bond.

Additionally, you can use Flex Glue to attach the bottom pressure-treated board to bond the wood with a concrete slab or paver foundation.
Flexpert Tip: You should use a double 2x4 header above each window and double studs on the sides of each window to properly frame and support these features.
4. Secure Lean-to Greenhouse

Because this is a lean-to style greenhouse, you’ll need to secure it to a solid structure. First, attach one 2x6x12-½” board to the wall of the garage or shed. This board is your header. The roofing joists will attach directly to the header.
Carriage bolts are perfect for securing the header board to the side wall of your existing structure. Predrill through the 2x6 and through the siding to create a path for the carriage bolts. On the inside of the shed or garage, an extra 2x4 block that fits horizontally between the wall studs can help strengthen the wall.

Flexpert Tip: For larger, heavier structures or sided buildings, cut away the siding and sheeting and screw directly to the studs on the wall.
5. Attach Joist Hangers

Next, you’ll attach joist hangers to the header. Each joist hanger will support a rafter, so you will want to space them according to the panels you use for your DIY greenhouse. The corrugated polycarbonate clear roofing in this tutorial is 2’ wide, and spacing of 19-½” is a standard measure allowing for some roofing panel overlap.
Use the miter saw to cut the end of each rafter at the necessary angle so it rests flush with the header board. You will also need to notch the underside of the rafter where it touches the exterior wall of the greenhouse. The rafter joist should sit comfortably in the joist hanger and on top of the greenhouse wall.
Flexpert Tip: It helps to cut one rafter perfectly and then use it as the template for the remaining rafters.
Use nails to secure the roofing rafters to the joist hangers and to the top of the greenhouse wall. Then, attach three rows of 2x4 blocks between the rafter joists. These blocks will help support your roofing and keep the rafters from twisting over time.
6. Install Windowsills and Framing

Once the roof is hung, you can turn your attention back to the spaces you framed for the windows. Install windowsills and window and door frames as necessary. Make sure that any windowsills are angled to promote outward drainage.
7. Apply Flex Seal Liquid

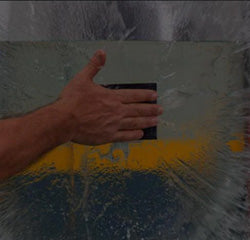
Flex Seal Liquid creates a durable rubberized coating that helps waterproof the wood and protect it from the elements.
To get started, stir (don’t shake) one gallon of Flex Seal Liquid and use a paint tray and roller to apply it up and down each joist for thorough coverage. Switch to a paintbrush to cut in anywhere the roller cannot reach. Full and complete coverage of the wood on your DIY backyard greenhouse will preserve it and help it endure moisture and humidity.
Flexpert Tip: It’s best to apply Flex Seal to the entire wood structure before installing the windows, door, and roof panels. Allow at least 24 hours for the Flex Seal Liquid to dry and cure before applying additional coats and/or moving on to the next step.
8. Attach Roofing

For this step, you’ll attach the roofing using screws designed for corrugated roofs. These screws help seal out moisture. Working with one sheet at a time, screw the 2’x8’ lengths into the roofing joists and 2x4 blocks. The sheets should run parallel with the rafters and overlap by two corrugations to protect the rafters and interior from moisture penetration or wind.
Flexpert Tip: Keep in mind that this tutorial uses 8-foot lengths of roofing, but longer lengths are also available if the dimensions of your structure vary.
9. Install Windows and Door

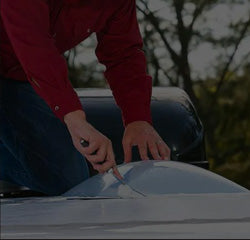
Now it’s time to install the windows and door for your DIY greenhouse. Test to make sure they open and function as expected. Use the caulk gun to apply a bead of Flex Seal Glue around the perimeter of each window to seal out air and create a strong bond.

10. Attach Panels to Cover Gaps

Lastly, address any empty framed spaces above and below the windows. To seal these areas from the elements, cut extra pieces of clear corrugated roof¬ing to fit each space. Use the remaining screws to attach the panels to the framed structure.

Not only does this DIY greenhouse look great, but it’s also protected for the long haul because of Flex Seal products. Now those plants and veggies can stay strong all year long!
Related Articles


CRAFTS & DIY PROJECTS


- Choosing a selection results in a full page refresh.